All disk partitions have been created when building the Server, is it possible to shrink a partition without losing data? Yes, in this article, I'll tell you how to shrink partition in Windows 2003 Server.
Why shrink Windows 2003 Server partition
Disk partition layouts and properties in different Servers are practically impossible the same, but the demands to shrink partition in Windows 2003 Server can be divided into two kinds,
- Shrink partition and create new partitions
- Shrink partition and extend another drive
Shrink partition and create new partitions
The typical example is when installing Windows 2003 Server, you created one partition with all space of the hard disk and installed Operating System.
Some administrators created C: and D: drive, in daily usage, they found that C or D is too large and waste space. To read and write files easier and faster, they need to create more partitions to save different files.
Many people are not satisfied with the brand Server default partition settings, especially, these Servers already used 3 Pirmary partitions, to create new partitions, you have to shrink the extended Logical partition.
Shrink partition and extend another drive
Even for an experienced administrator, they'll face to the 'Low Disk Space' problem, as Windows continuously download updates. Applications will write files to system partition even if you change the default installation path to other drive.
When there is no free space in C drive, what to do? Start from scratch? No, shrink an existing data partition and extend C: drive.
How to shrink partition in Windows 2003 Server without losing data?
To solve the problems easier, I want to give different solution for the demands listed above.
Shrink and create partitions
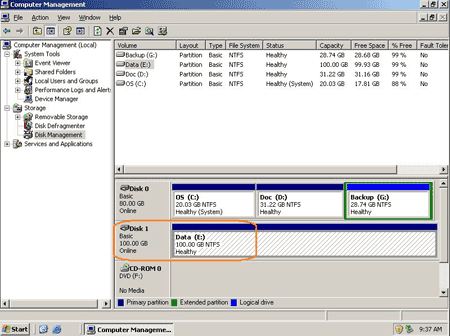
Step 1: Launch Disk Management to check disk partition layout and make sure which partition to shrink.
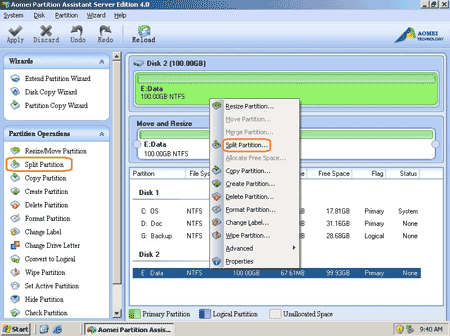
Step 2: Launch Aomei Partition Assistant, you'll see disk partitions layout similar with Disk Management.
Right-click the partition you want to shrink and select 'Split Partition...' or run this feature from left 'Partition Operations' panel.
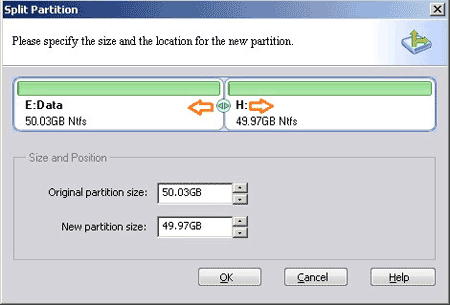
Step 3: In the pop up window, original partition will be shrank to 2 drives, you may keep the default partition or change partition size by yourself.
- Drag any border of the two partitions on the top
- Type a value for partition size in the bottom box
- Press up and down button
Step 4: In the main window, click 'Apply' on top left to proceed shrinking.
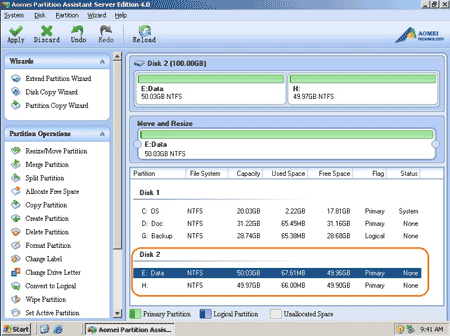
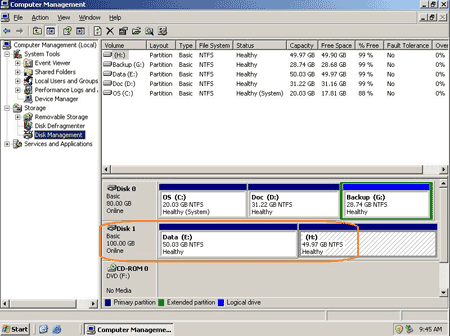
After shrinking completed, check again in Disk Management. Yes, original 100GB E: drive shrank to E and H drive now.
Shrink and extend partition
Both 'Resize' and 'Allocate Free Space' feature will help you, refer the pages below,
- How to resize Windows 2003 partition with 'Resize' feature?
- How to resize Server 2003 partition with 'Allocate Free Space'?
Related Articles
- How to resize RAID 1 partition without rebuilding?
- How to resize partition in VMware Server?
- Add space to C drive in Windows Server
- Partition manager for Server 2003
- Windows 2003 partition software
- How to resize partition in Windows 2003 Server 64 bit (x64) edition?